My Piazza 2 - UK edition

Showcase your rides here. Read "Picture Help" to find out how to host your pic's
twocan
Junior Member
Junior Member
Posts: 45
Joined: Wed Jul 20, 2005 8:24 pm
Location: Indro, Brisbane

Re: My Piazza 2 - UK edition

Post by twocan »

This brings me to the next thing, i'm not sure i'll do a good enough job of this but i was hoping to use the forum as a bit of a list of what i've done so i can look back on it when the modification inevitably breaks and i'm not sure what i've done or how to fix it. The intent here was to be as soft touch as possible but to modernize the car as much as possible and keep the ability for it to be returned to standard if need be. After many months assembling parts from all over the world, Australia, the US, UK (IPTOC FTW) and Europe i have decided to have a go at it.
Image
Image

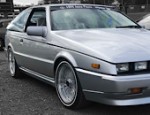
at the moment this of things is
  • MAXX ECU Race engine control unit
  • MAXX ecu relay box and ebay special 80 relay box for power steering
  • Will Welding Manifolds (inlet and exhuast)
  • IS12 Turbo with egate (from a 1.8t ea888 polo)
  • custom made H-bridge controller to drive the VW electric Waste-gate
  • New dizzy with AEM trigger wheel and 3d printer short cap
  • Generic 36-1 Crank trigger wheel and Vauxhaul sensor
  • Bosch drive by wire throttle
  • ASNU 550cc injectors with spacers made to fit the manifold
  • Continental flex fuel sensor
  • Bosch knock sensor
  • Honda CRV independent accel pedal sensor
  • BMW periburg water pump
  • vw auxiliary water pump for turbo and heater
  • Volvo Electric power steering
  • New allow radiator from st205 celica, jury is out if it will fit yet
  • Jaguar Transmission cooler
  • twin electric fans and speed controllers from ecu
  • Fuel pump PWM controller from a Volvo
  • EMAP sensors installed in a generic Fuel filter housing and x4 egt sensors
  • can checked steering wheel switch board (so i can keep cruise control working)
  • Generic Intercooler 450x300x76
  • BMW exhaust flap motors to allow me to swap the eyelid motor to fit the intercooler and a second one to drive the TV valve of transmission so its shifts and doesnt slip etc
the poor old girl is now slowly having pieces removed and stored and pictures taken so i can put it all back together
Image

After this its making a plan to get the physical stuff installed in the car and mounted and then i will have to start on wiring to get it running again. which in itself will be a big task and i am going to guess will take me 3 times longer than i expect. I know things like sensor mounts, piping and fan shrouds etc will also be quite time consuming but hopefully i will remember to take photos as i go along.

Once this is complete it will need to be wired up and the ecu setup to try make it run agian, hopefully the aus spec wiring diagrams are enough for this. but this is a long way off at this point. I will update as much as possible fingers crossed i can keep steady progress.
User avatar
Piazza_man
Site Admin
Site Admin
Posts: 874
Joined: Sun Dec 12, 2010 9:53 pm

Re: My Piazza 2 - UK edition

Post by Piazza_man »

Quite a list you have there. Keep posting updates, but if I can impart one takeaway from personal experience is that you complete one task at a time, especially the rewiring. Complete, test and validate each task in smaller sequences before moving on to your next task. Multiple tasks at the same time will cause frustration when trouble shooting and then having to work backwards to isolate which task caused the issue.
twocan
Junior Member
Junior Member
Posts: 45
Joined: Wed Jul 20, 2005 8:24 pm
Location: Indro, Brisbane

Re: My Piazza 2 - UK edition

Post by twocan »

wise words, I whole heartedly agree and have been trying to focus on one system at a time. The list did get a bit out of hand as things sort of snow balled as I got into it. progress is slow at the moment its cold and dark and hard to balance a day job with with working on cars, a struggle i'm sure most on here are familiar with.

So far after removing as much as i can from the engine bay i did some basic fit ups of the fundamental pieces (turbo, rad and manifold).

Image

Image

Image

Image

The preliminary assessment is that it will mostly fit, the Rad is to tall with the filler cap on-top and i now have a small rad cap shaped dent in the bonnet but i'll deal with that later.

Image

Image

Image

Image

after this i decided to try focus a bit on a one thing. the first was the 140amp alternator.
https://www.ebay.co.uk/itm/142991181785 ... gLZ9fD_BwE

https://www.ebay.co.uk/itm/401336076303

this was for an 80 series landcruiser, it is physically bigger and the Bpost is in the wrong orientation but i believe i can get around this with a b-post adaptor.
https://www.ebay.com/itm/134883992453

Image

Image

the fit is Ok i think, the adjustment bracket needs some adjustment with a drill, saw and file and the b-post will hit the body if your not careful

Image

Image

Image

Image

Image

i think if you just wanted an upgrade this might work, but i haven't run it in anger so can't confirm anything properly yet.

after making some progress i decided i would then start looking at the coolant system, the first thing to do was to make the Radiator actually fit in. the new allow radiator is essentially the same size as the OEM piazza one except thicket and has the fill cap at the top. to make the radiator fit into the car i had to,
- cut the bottom posts used to mount into a celica off
- cut the fill cap off
- cut the bottom pipe so it comes out of the rad at 45+ deg (otherwise it hits the chassis rails)
- make a new bottom mount plate like the OEM one
- make a rad fan shroud for the new electric fans

Image

once this is all welded back together i shall try to get some more photos of the other parts for interests sake. the fan shorud i made is not pretty but i'm hoping it will function. after this i will move onto water pumps, fitting the new electric pump and removing / disabling the OEM mechanical unit. there is also significant amounts of pipe work to be done before i can pressure test the whole system then hopefully run the pumps and see if any of this worked.
twocan
Junior Member
Junior Member
Posts: 45
Joined: Wed Jul 20, 2005 8:24 pm
Location: Indro, Brisbane

Re: My Piazza 2 - UK edition

Post by twocan »

Just thought i'd throw some details together of the fan shroud i made (though not very proud of). As i was putting the celica radiator into the car i thought it would be a good idea to use some electric fans with PWM speed control from the new ECU. to mount the fans on the rad i needed to create one (as i think the OEM celica unit wouldn't fit anyway). I use 2.5mm think aluminium sheet which i think is way to thick for this sort of work and 1.5mm would suffice and be much easier to work with.

As i don't have any metal folding and limited anvils and hammers etc i had to bend most of it using a ball peen hammer, vice grips and a shifting spanner, hence the not very good result. Cut some piece of flat sheet out to mount the shroud to the radisator and rived that on, hopefully it will hold OK, if not it can be welded later.

Image

Image

Cutting the material with a jigsaw though worked well and i even managed to add a few extra flow hole with flaps that hopefully will be able to open when there is airflow through the radiator at speed

Image

Image

the end result looking a bit like this when installed with fans on the radiator. hopefully this will be up to the task when everything else gets installed.

Image

next step is finishing off the radiator fill point removal and outlet reposition which require aluminium welding which i dont have the skills to do yet but will ask a friend to see if they can help.

Image

Image
User avatar
Piazza_man
Site Admin
Site Admin
Posts: 874
Joined: Sun Dec 12, 2010 9:53 pm

Re: My Piazza 2 - UK edition

Post by Piazza_man »

Nice upgrades and keep those updates coming in. Love seeing what others are doing with their rides.
twocan
Junior Member
Junior Member
Posts: 45
Joined: Wed Jul 20, 2005 8:24 pm
Location: Indro, Brisbane

Re: My Piazza 2 - UK edition

Post by twocan »

things have been moving slowly and far more changes were required to plans than i had imagined, i have however started making things to try keep progress happening even if baby steps.

the first of the issues to solve is is water pump fitting and bypassing of the mechanical unit, i ended up getting an mechanical fuel pump from a vaxhaull midi pump thinking i could knock the impeller off but they are definitely different sizes

Image

I don't have photos at hand but i ended up chopping it up to make a pump bypass, this did require once again leaning on a friend to do the allow welding, i did however manage to come up with re using the idler pulled on the vbelt to try allow the bigger alternator to be tensioned better and not touch the chassis rail.

I mounted a lot of coolant equipment up and had to modiy the oem coolant inlet (which will now be an outlet with the new electric water pump sitting far lower than the original pump. so i found a coolant inlet from a 4ze1, which is different but i could hack up without loosing the ability to go back to stock.

Image

after doing this i was paralysed with indecision about the coolant water circulation requirements and pipe work routing so got distracted and i realised there isn't much room between throttle body and radiator so one of the guys at work printed up a 3d design to see if getting something made would help

Image
Image
Image

not sure if i should go down this route or find another way, but will keep looking

I also made a coil pack holder, i'll be using subaru coils in a coild on plug fassion but make up my own leads as they were easy to get so i made up a dodgy little bracket for the coil packs out of 2.5mm thick aluminium.

Image
Image
Image

i also made a bracket to mount the new transmission oil cooler, this cooler is from a jaguar and look like it will fit under the manifold and plumb into the new coolant pipework (when its made). it uses 12.6mm quick disconnects and 16mm id hose connections, and was quite cheap second hand, it should have enough cooling capacity for the gearbox as i think the oem cooler is just one piece of copper pipe.

Image
Image

the next thing to do it to get manifolds for coolant water made up and pipe work bent around and fitted to supply coolant to the heater, transcooler and also refining the throttle body inlet inter cooler positioning and a turbo inlet for the is12 needs to be make (i think this one will be for sure 3d printed. oem VW turbo inlets are not the right orientation for this modified turbo.

Image
User avatar
Piazzish
Member
Member
Posts: 134
Joined: Thu Apr 16, 2009 10:32 pm
Location: Norway

Re: My Piazza 2 - UK edition

Post by Piazzish »

Will be interesting to see the end result and numbers. Keep the posts coming :)
1989 Isuzu Piazza JR120 Lotus Turbo Red 92000km
1989 Isuzu Piazza JR120 Lotus Turbo White 183000km
1987 Isuzu Piazza JR120 Pre-Lotus Turbo Red 131000km
1984 Isuzu Piazza JR130 N/A Two-tone 145000km
1984 Isuzu Piazza JR130 N/A Black 92000km
1989 Isuzu Gemini JT190 Red 173000km
Post Reply